
1: How do I get started creating a New Course?
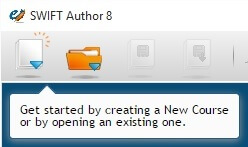
To begin creating a New Course select "New Course" from the main toolbar. SWIFT will prompt you for the title and a folder to save your new course to begin. The course map on the left will display with the default Course Layout expanded. You can choose to use the default or define your fonts, colors, headers, footers, etc. for the overall look and feel of your course in the "Course Layout". Establishing these parameters speeds up development and ensures consistency throughout your course especially if there are multiple authors.
2: What do you use the Course Layout for?
The Course Layout is for defining your defaults (properties and text) for Topics, Modules, Concepts, etc. Designing your layout features in advance saves you time and enforces sound instructional design as your course will have consistency throughout, especially if there are multiple authors.
3: Can I make changes to the Course Layout after I have begun developing my course?
You can make change to the Course Layout after you have begun. Changes will apply to new concepts you add from that point on. Changes made to the SWIFT Styles in the Course Layout will apply to all content that has not been overridden using the WYSIWYG toolbar.
4: Do I need to worry about designing for mobile first, how does that work in SWIFT?
You do not have to design for mobile first, this is all done for you! SWIFT detects and automatically resizes to fit the device the learner uses to access your course. SWIFT Learning interface is optimized for smart phones so the course functions just like an App.
5: How do I develop for HTML5 responsive functionality or does SWIFT handle that?
You don’t have to design your content for each device size or figure out where everything will fit; SWIFT takes care of the HTML5 responsive functionality for you. There are four responsive templates available to design your content. Within the templates are one, two, three, or four boxes; the default is one box. If you are adding graphics, pictures, or media, then for optimal viewing insert them in separate boxes.

With the “Author” button active , a responsive template has the orange feather displayed on a blue header bar and is outlined with a faint line; a box is indicated by a dashed line within the template. The header and the dashed lines are not visible in the SWIFT Learning Environment (LE).

The content in each box will scale and adjust once SWIFT detects the viewer size and, if there are multiple boxes, they may stack. SWIFT ensures that the content will always be displayed for optimal viewing whether the learner is accessing the course from a browser or from the SWIFT Learning App on a phone or tablet.
6: How do I set up my fonts, sizes, etc.?
You can customize your fonts, sizes, etc. or you can use the default settings in SWIFT. To customize go to the Course Layout at the top of the course map and open Properties to access the SWIFT Styles editor. Expand each category by clicking on the “+” button (for example, “Default Text”).
You can select different sizes that your style will apply to by using the width buttons. Styles are applied to the chosen size and smaller; styles set for “Print” are separate. To view the SWIFT LE, click on “Preview” for the browser and “App Preview” for the SWIFT Learning App.
7: What is the “Style” button for?
The “Style” button on the toolbar is for advanced style sheet editing. If you are familiar with Cascading Style Sheets (CSS) then you can add classes and set styles directly. Use the “Open Style Sheet” button to edit the appropriate style sheet based on viewport size
8: Do I need to provide different font sizes for delivering on different devices?
You do not need to provide different font sizes for delivering on different devices. By default, SWIFT detects the device and optimizes the font size. You can change or override this default by using SWIFT Styles and specifying the font sizes for specific device sizes.
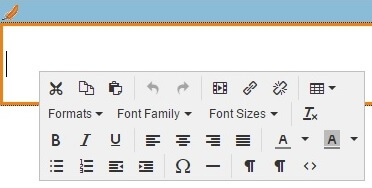
9: Can I edit formatting for separate concepts?
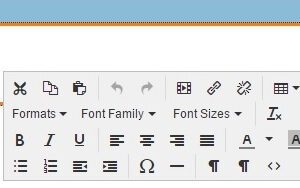
You can edit formatting within a concept separately by right clicking to open the WYSIWYG toolbar which will override the default setting.
10: Can I add a Header and Footer?
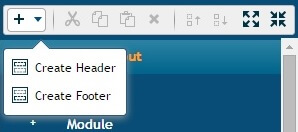
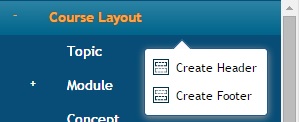
You create your header and footer in the Course Layout. Just click the + to expand the Course Layout; if you do not have a “Header” or “Footer” item shown, just add one to the Course Layout by right-clicking on “Course Layout” for options or by clicking on the +Add button.
11: Do I supply images to insert as the footer image to you later on, or do we insert all the images, videos etc inside the course?
Please insert all your images, videos etc at the level they are presented in your course including your header and footer.
12: Can I preview my course for different devices in SWIFT Author?
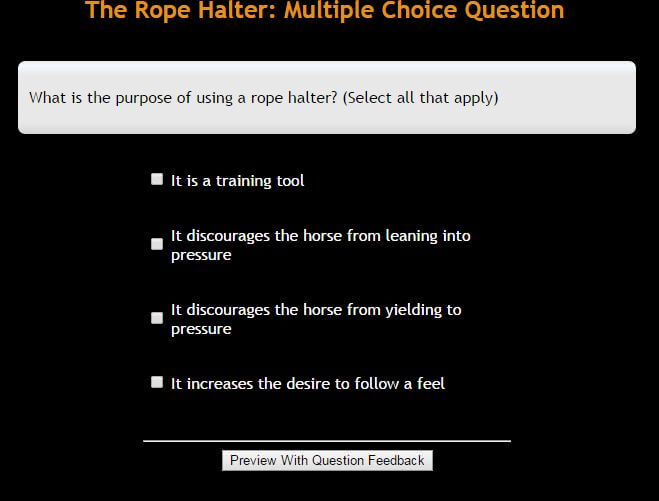
You can preview your course for different devices by selecting the “Preview” button for the desktop, and “App Preview” to toggle a SWIFT App simulator; you can navigate your course using either.
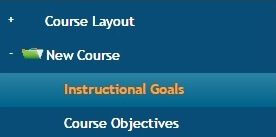
13: How do I create adaptive learning using Instructional Goals?
To create adaptive learning using Instructional Goals highlight the Instructional Goals title in the course map and then open Properties located in the top right corner.
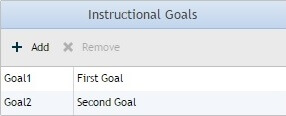
Click the + button to add goals and x to remove them. Edit a goal name by double-clicking in the right-hand box beside each goal. To assign your Instructional Goals, click on a concept and select the Goals you want applied to that concept in Properties. You can also select all concepts at the Module Level and respectively for all Modules at the Topic Level.
14: What if I don't have Instructional Goals?
If you don't have Instructional Goals this window will not be presented in the SWIFT LE.
15: What if I only have one instructional goal, can we ignore this and not have it presented to the learner?
Yes, if you do not want to include instructional goals, then you can ignore this and SWIFT will not display this window in your course.
16: Why is my new topic adapted out of the course and appearing in italics within the course map?
A Topic will appear in italics if it has not been assigned to an Instructional Goal. Topics get their initial instructional goal assignment from the Course Layout Topic. If you want to change which goals are automatically assigned to new topics, select the Topic in Course Layout, open Properties, and select which goals should be default.
17: Why do Instructional Goals move in the course map when I change them for a Concept, Module or Topic?
Instructional goals will move in the course map if they have been changed. If you change Instructional Goals at any level in SWIFT Author those changes cascade down or, up, as each Topic, Module, and Concept is linked to each other.
18: How do I preview adaptive learning using Instructional Goals?
You can preview adaptive learning using Instructional Goals by selecting the “Entire Course” or the “Adapted Course” in the course map.

Use the “Back” and “Forward” buttons (lower right hand corner) just like in the SWIFT LE to view your adaptive course; any concepts that are adapted out will not be presented.
19: How do I create adaptive learning using Pretests?
You can create adaptive learning two ways: Creating Instructional Goals and/or Pretests. To adapt learning based on pretests is super easy. This is not at all like branching content, once you have created your questions, click on each one and open Properties. Under Question Pools, click on the Module Pretest box. Set a mastery level for the module in Properties. SWIFT has a built-in adaptive testing algorithm that uses a combination of the mastery level and the number of questions in the pool to determine if the learner is a master or non master. SWIFT tests until mastery or non mastery is determined
20: How do I set mastery levels for the course?
You set mastery levels by highlighting the Course Objectives in the course map and then opening Properties
21:Can I set different mastery levels for modules?
You can set different mastery levels for modules by highlighting Module Objectives in the course map and then opening Properties.
22: What if I want some questions mandatory with the adaptive testing?
You can include mandatory questions with adaptive testing. Simply highlight the question, open properties and click yes beside the mandatory option. Mandatory questions are if the learner masters the adaptive test.
23: How are the adaptive testing algorithms used in SWIFT courses?
The adaptive testing algorithms are used to shorten testing time while determining mastery or non mastery. An example would be if you set the mastery level to 50% and created 5 questions. If the learner fails the first three questions then SWIFT will stop testing and present all the content associated with those questions.
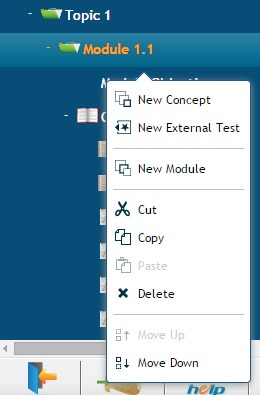
24: How do I add examples to concepts?
To add examples right-click on the concept title and select "New Example."
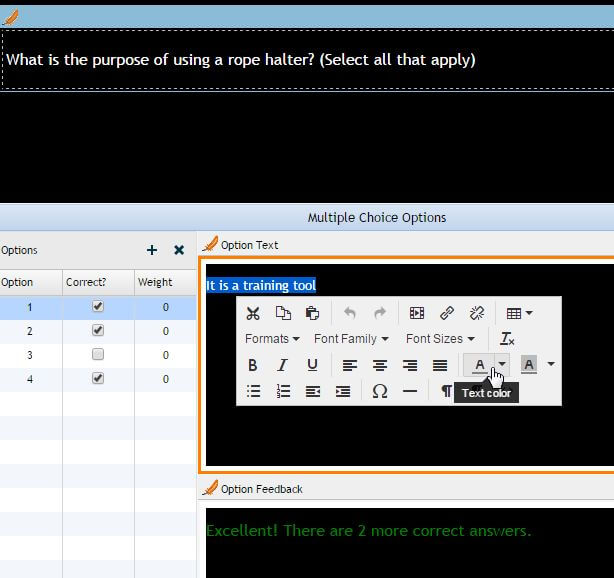
25: How do I create questions?
To create questions, right-click on the concept title and select "New Question." A new question will be added to the course map, copied from the Course Layout, therefore the question will have the same content, properties, and options

Open Properties by clicking the Properties Icon located in the top right corner.
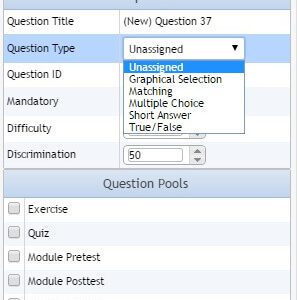
Choose the Question Type from the dropdown menu. You have a choice of 5 Question Types: True and False, Multiple Choice, Short Answer, Matching, and Graphical Selection. In Properties assign the question to: exercises; quizzes (forces learner to answer correctly before continuing); module pretest (adapting content); module posttest (if learner masters module SWIFT adapts course posttest questions); and, Mandatory (questions are always presented)
True/False
- In Properties set whether True or False is the correct Answer
Matching Question
- Set the correct Answer in Properties
- Add, delete, and edit Response Cases
Note: There should always be an incorrect final case with the pattern .* (a period follow by a star). This pattern checks for "anything else" -- i.e., it will check for answers entered by learners that are not covered in the other patterns.
- Add one or more Case Pattern(s) that will match that Response Case
- Indicate which Option(s) is/are correct
- Note: There should always be an incorrect final case with the pattern .* (a period follow by a star). This pattern checks for "anything else" -- i.e., it will check for answers entered by learners that are not covered in the other patterns.
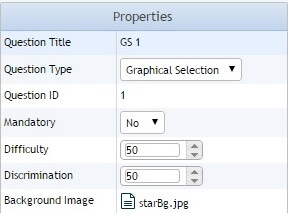
Graphical Selection
- Edit the checkbox Options
- Add and delete Options using the + and x buttons
- Set the X, Y coordinates exactly in the grid, or drag a checkbox in the map
- Indicate which Option(s) is/are correct
- Edit the Feedback Text for each selected Option in the editor
- Select your Background Image either in Properties or by clicking the picture icon (circled in orange).

Matching Question
- Edit the Options
- Add and delete Options
- Select an Option to view the Option Text and Feedback
- Edit the "From" Option Text and the Feedback for each Option
- Click "Matches To" to edit the "To" Option Text for each Option
Multiple Choice
- Set "Randomize Options" and "Mutually Exclusive" in Properties
- Edit the Options
- Add and delete Options
- Select an Option to edit the Option Text and Feedback
- Indicate which Option(s) is/are correct
- Set the Weight for each Option
26: Can I add supplemental content that isn't part of the concept?
You can add Supplemental content that learners can choose to review. Right-click on the Concept Title and select "Add Supplemental.
27: How do I enter Module Objectives?
To enter Module Objectives right-click on Module Objectives under each Module and enter your content in a box that displays an orange feather. The box will be highlighted with an orange border when entering content.
28: Can I add supplemental content that isn't part of the concept?
You can add supplemental content that learners can choose to review within your course and also as a way to engage the learner external to the course. To add supplemental content within your course, right-click on the Concept Title and select "Add Supplemental." To add supplemental content external to the course contact us and we will publish it to GeMS and set up how you would like to notify your learners through SPOC.
29: What is involved in adding different content types like graphics, videos, and tables that will adjust for optimal viewing depending on the device?
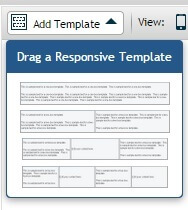
Adding graphics, videos, pictures, tables, etc. that will resize for optimal viewing is handled through our built-in responsive templates. The default template is one responsive box, so everything resizes within that box. Select one of the other templates to insert content like videos, graphics, etc. into separate boxes so that SWIFT will individually resize or stack them for optimal viewing. To add a new template, click on the Add Template button and drag and drop one of the template options into the window. Templates can be rearranged by dragging the blue bar and dropping them into their new position, and they can be removed by clicking on the trash icon.
30: How do I enter and format content?
 Adding graphics, videos, pictures, tables, etc. that will resize for optimal viewing is handled through our built-in responsive templates. The default template is one responsive box, so everything resizes within that box. Select one of the other templates to insert content like videos, graphics, etc. into separate boxes so that SWIFT will individually resize or stack them for optimal viewing. To add a new template, click on the Add Template button and drag and drop one of the template options into the window. Templates can be rearranged by dragging the blue bar and dropping them into their new position, and they can be removed by clicking on the trash icon.
31: How do I insert a topic/module/concept in the middle of my course structure?
You can insert a new topic/module/concept by right-clicking in the desired location in the course map. You can also use the up/down buttons or Cut and Paste to rearrange your course map.
![]()
32: Why is the “Back” or “Forward” button sometimes disabled?
The “Back” and “Forward” buttons will be disabled when concept titles are in italics. Concepts in italics are not part of the adapted course path as they have not been assigned to the active instructional goal. If any of the concepts are assigned then the buttons will still be enabled, but will skip the concept that is not part of the adapted path.
33: Why does the “Back” or “Forward” button skip content in the course map?
The “Back” and “Forward” buttons navigate through the course just as your course would in the SWIFT LE. If the content is not assigned to that instructional goal it has been adapted out.
34: Why is Paste disabled in the course map?
The SWIFT three-tier course hierarchy is comprised of Topics, Modules, and Concepts, which are based on proven instructional design principles that help guide your course development. When Paste is disabled, SWIFT will not allow you to add a Topic, Module, or Concept at the wrong level in the hierarchy.

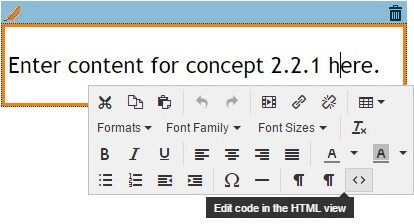
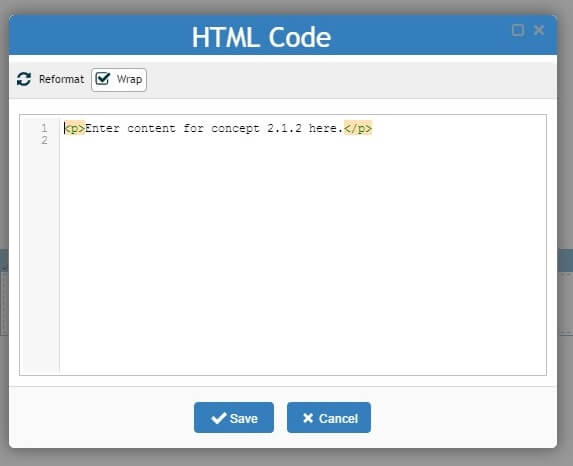
35: Can I add my own HTML?
You can add or edit HTML by right-clicking in a content box and selecting the <> button to access the HTML code for that box only. Note you cannot enter style sheets or JavaScript within a box, only HTML <body> content.
36: How are the titles in the course map named? What does the number in the title mean?
Questions are automatically named when you assign the question type, unless you change the title first. Other titles are created as you add levels to the Course Layout along with a unique number to identify it.
You can override the title but it must be unique within each level of the hierarchy (for example, all concepts must have different titles). To reset a title to an automatically generated one, clear it in the Properties "title" field. You can change the initial prefix by editing the title in the Course Layout.
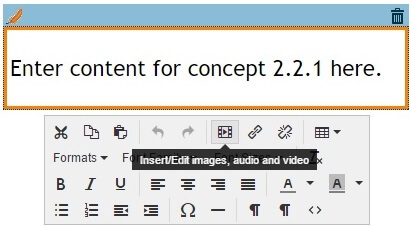
37: How do I add media?
You can add various media types using the WYSIWYG toolbar accessed by right-clicking the mouse inside the content box; select the "Insert Media" button.
38: What types of media are supported?
SWIFT supports multiple file types for audio and video necessary to view on a variety of devices, if desired (for example, iOS and Android devices support different media formats). Flash fallback support is provided for delivery to older browsers which do not support the HTML5 media types.
All HTML5-supported graphics, audio, and video are supported in SWIFT:
- images (bmp, gif, jpg, png, svg, webp)
- audio (mp3, ogg, wav, webm, flash)
- video (mp4, ogv, webm, flash)
- streaming audio/video sources
- custom HTML objects objects (supporting legacy <object> and custom <iframe> code)
For videos larger then the recommended 30 MBs streaming is required. The SWIFT platform includes streaming video delivery so you don't need to worry about setting up an account with an external provider saving you time and money. You won't need to create your video for multiple formats, handle multiple codecs, resolutions, and all that nasty stuff.
39: How do I create videos for streaming?
You can create your video file and embed it in the course using the Media dialog. Then, Gemini will handle conversion and anything else necessary prior to uploading to Vimeo -- you just have to deliver the video file to us along with the course once it is ready for publishing to GeMS.
40: What if I would like to preview videos in SWIFT Author before they are published for streaming?
If you would like to preview your videos in SWIFT Author before they are published for streaming, you will need to create multiple file formats of your video (eg. both mp4 and webm files) and insert each source into the Media dialog; then, SWIFT Author will play the WEBM in Preview but when we upload your video to Vimeo we'll use the higher quality version (you could make a high-quality mp4 video and a preview-quality webm copy).
41: Why doesn’t my video play in Author Preview?
SWIFT Author can preview ogg, wav and webm files for audio, and ogv or webm files for video, as well as any streaming media. Due to licensing restrictions on the mp3 and mp4 formats, those cannot be previewed in SWIFT Author but will play correctly in the SWIFT LE. Flash media will play in SWIFT Author providing you have Adobe Flash Player installed on your Windows or Mac OS X system. (Note: Flash will not play on iOS devices as it is not supported by Apple.)
42: Why does Gemini handle the streaming video? Can’t I just embed my video files?
Gemini handles streaming for you as most mobile devices must download an entire embedded video before it will start playing. Streaming sources can be inserted to deliver content from hosts like Vimeo or YouTube so that the learner is not delayed in learning and they are not chewing up their data plan by downloading large video files. To ensure support for a broad range of devices (mobile and desktop) and a pleasant viewing experience we provide a streaming service that automatically transcodes media to different formats and delivers video playback appropriate to the viewing device. Your success is ours!
43: What about small videos, can they be embedded?
You can embed any media file that does not exceed 30 MB, however you will need to save each file in all of the different formats so that all browsers and devices will be able to play.
44: How do I create my video file to send to Gemini for streaming?
You can create your video file for streaming and embed it in the course using the Media dialog. Then, Gemini will handle conversion and anything else necessary prior to uploading to Vimeo -- you just have to deliver the video file to us along with the course once it is ready for publishing to GeMS.
Of course, you're welcome to create multiple file formats of your video (eg. both mp4 and webm files) and insert each source into the Media dialog; then, SWIFT Author will play the webm in Preview but when we upload your video to Vimeo we'll use the higher quality version (you could make a high-quality mp4 video and a preview-quality webm copy).
45: What format and settings should I use when creating my video?
You only need to create one video file in one format and Gemini will handle any necessary conversion. Mp4 is the recommended format (using the H.264 codec) but you will not be able to preview this file type within SWIFT Author. If that is suitable, then use mp4/H.264; otherwise, choose webm (or ogg/ogv as a last resort) if it's available in your video creation software and you will be able to preview it in SWIFT Author. Because Vimeo will deliver the video in other formats and resolutions applicable to the learner's device, you're free to create your video in as high a quality (resolution and frame/bit rates) as you desire, in order to achieve the highest possible quality across all devices.
For resolution, 720p is usually sufficient if you desire HD as anything higher will likely be unnoticed on most mobile devices. For SD (standard definition) quality, either 640x480 (4:3 aspect) or 640x360 (16:9 aspect) is sufficient. Of course, it depends on your video content and your intended audience; high action videos should use higher frame rates, for example. The bitrate affects the size of the video file as well as playback quality; higher bitrate videos will have larger file sizes but better playback quality. Keep in mind that higher quality videos will consume larger amounts of learners’ mobile data plans.
46: Resolution, bitrate, frame rates, codecs, formats, … how do I figure it all out?
Figuring out all the resolutions, frame rates, codes, and formats for video is a quagmire! Here are some online references to help figure out video jargon and choose which settings will deliver the best video experience.
Vimeo offers the following guidelines for creating the best video experience:
Recommended video bitrates from YouTube :
- 720p: 5 Mbps (standard) 7.5 Mbps (high)
- 480p: 2.5 Mbps (standard) 4 Mbps (high)
- 360p: 1 Mbps (standard) 1.5 Mbps (high)
Where:
- standard = Frame rate of 24, 25, or 30 FPS
- high = Frame rate of 48, 50, or 60 FPS
- 1Mbps = 1000kbit/s
Streaming 101 : The Basics - Codecs, Bandwidth, Data Rate and Resolution
47: Do I have to worry about making media types responsive?
Regardless of the media type, when media is inserted into a responsive template, the image or player will automatically scale to fit to the size of the view it's delivered within, while retaining the correct aspect ratio. The size entered in the Media dialog is used not only to calculate the aspect ratio of the player but also to limit the maximum size on a large screen; the player will scale smaller as necessary.
48: Do I have to worry about making media types responsive?
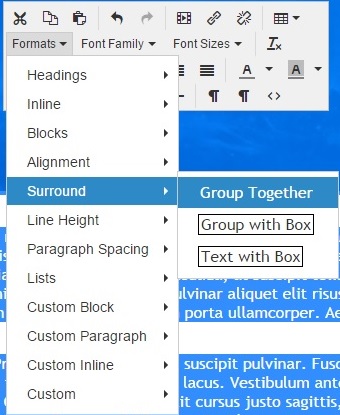
To wrap text around a picture follow these steps:
- insert your text
- insert your image on its own line
- select all (text and image) either with the mouse or use Ctrl+A
- from the Formats menu of the WYSIWYG toolbar surround the text and the image using “Surround > Group Together".
- from the Formats > Custom Paragraph menu apply "p.floatright" (or "p.floatleft") to the image
49: Where is the restore button? What does it do?
![]() You can restore any changes by clicking the button in the top right corner of the toolbar beside the Properties Icon. This will restore any changes made to the current selection in the course map, including title, content, and properties.
You can restore any changes by clicking the button in the top right corner of the toolbar beside the Properties Icon. This will restore any changes made to the current selection in the course map, including title, content, and properties.
50: How do I rearrange responsive templates?
Templates can be rearranged by dragging and dropping the blue bar. They can be removed by clicking on the trash icon.

51: How do I undo changes to content in a box?
To undo changes in a box use Ctrl-Z or undo from the WYSIWYG toolbar which is accessed by right-clicking in the box.
52: What is “Files to Upload” used for?
SWIFT Author keeps track of all the files (for example, audio and video) referenced in your course in order to publish to GeMS. However, sometimes files are buried within referenced content and SWIFT Author cannot find these automatically (for example, if <iframe> code references an HTML file that then includes other files like styl e sheets or JavaScript). In this case, use “Files to Upload” to specify additional files that should be published with your course.
53: In the Files to Upload, how do I change an existing file?
To change an existing file in the Files to Upload, click on the filename and select a new file.
54: How do I edit module titles, etc.?
To edit module and other titles double-click on the title in the course map and edit in-place; use enter/return or click elsewhere to save the change. Or, within Properties double-click on “Title” to edit there. If you clear the title in Properties, SWIFT will automatically name it.
55: What are the minimum and recommended system requirements?
Windows:
- Minimum: Windows XP SP2+ (until the end of 2015)
- Recommended: Windows 7 SP1 or later
- Minimum processor: Intel Pentium 4 or later that's SSE2 capable
- Recommended processor: Intel Core 2 Duo, Core i3, Core i5, Core i7, or later
- Minimum free disk space: 350MB
- Minimum RAM: 512MB
- Recommended RAM: 4GB
Mac OS/X:
- Minimum: Mac OS X 10.6 (Snow Leopard) or later
- Recommended: Latest Mac OS X Snow Leopard or Mac OS X Lion
- Minimum processor: An Intel processor that's 64-bit
- Recommended processor: Intel Core 2 Duo, Core i3, Core i5, Core i7, or later
- Minimum free disk space: 350MB
- Minimum RAM: 512MB
- Recommended RAM: 4GB
Flash playback requires Adobe Flash Player NPAPI plug-in, available from This Link
56: How do I know when something has been modified?
The first time you change something in your course, a “*” will be added to the title in the window to notify you that something has been modified. SWIFT will prompt you to save any changes from that point on, unless you use the Save or Save As buttons.
When you make a change to content, you will see a few things:
- the "restore" button on the toolbar (upper right, next to the Properties button) will turn orange, indicating that this item can be restored to its previous content
- the bottom right of the navigation bar will say "MODIFIED".
57: How do I add questions to external tests only?
You can add questions and create External Tests from either the entire pool of questions or from the question pool of any module. First, select the course or module title in the map, and then from the right-click menu choose “New External Test”. This will add a new external test to the map, which you can rename. Then use the Questions button to select which questions you want assigned to the External Test from the pool of questions. Questions can be used multiple times by selecting from the test pool options.
58: Why can’t I move Questions or Supplemental Content in the course map?
SWIFT provides a three-tier hierarchy (Topic, Module, Concept) and, within each Concept, Examples, Exercises (Questions), and Supplemental. This structured hierarchy ensures sound instructional design and guides the development process. You can reorder or cut-and-paste content within a Topic but you cannot alter the hierarchy.
59: Why can’t I move Questions or Supplemental Content in the course map?
When you cut-and-paste paste content from another application they do not convert the content reliably to HTML and they inevitably include a lot of undesirable formatting. By design, SWIFT Author strips out all the formatting and only pastes in the text from the clipboard so it can be reformatted properly. You can use your other application or a third-party x-to-HTML service to save your content as HTML, then paste the resulting HTML into the "HTML Code Editor" using the "<>" button on the WYSIWYG toolbar. Any classes defined in the HTML will have to be copied into a SWIFT style sheet; cut them from the HTML, click on the “Style” button, select “custom_full.css” from the “Open Style Sheet” button, and paste the classes in the file.

The first two options below require you to copy and paste the Word document into the webpage for conversion. The third one allows you to upload the file itself, and it will email you the html file after conversion. You can then paste the resulting HTML into the "HTML Code Editor" using the "<>" button on the WYSIWYG toolbar.
Here are some programs you can use to edit HTML:
- http://www.textfixer.com/html/convert-word-to-html.php
- http://word2cleanhtml.com/
- http://www.zamzar.com/convert/doc-to-html/#tool
In an upcoming release the styles will be automatically moved to a style sheet.
60: Why am I prompted to “Please choose an empty or new folder in order to avoid overwriting existing files.” when saving a course to a new location?
You will get a prompt to choose an empty or new folder when you save your course is a safety feature in SWIFT. Each SWIFT course must be saved in a separate folder or directory. A new course consists of several support files and, as you add new audio or video files to your course, by keeping each course separate there is no chance of one course interfering with the files of another.
61: Once a course is published, why does the page layout not look correct (eg. the header, the responsive templates, or the footer are not positioned as expected) in the Learning Environment using IE10 or IE11?
The course may not display correctly due to the resonsive templates that are not support, however you can disable "Compatibility View" in IE; this will enable the responsive template functionality in the browser. Here's how:

IE10: from the Tools menu, clear the checkmark from "Compatibility View".

IE11: from the Tools menu, choose "Compatibility View Settings"; if "swiftlearning.com" is listed in "Websites you've added to Compatibility View", select it and click "Remove" and then "Close".

62: Why do I have a black screen and I can't see the text?
You will have a black screen and unable to see the text if you changed the background to black in the course layout section. If you want a black screen or any dark color you can change the text to white or a visible color two ways:
1. Go to each question and highlight the black box and you will see the text then right click and change the text to White. One at a time. (When you hold your mouse button down and slide it across the text box the text will appear)
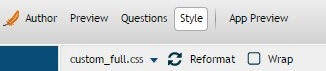
2. You can add this code to the stylesheet and it will do the change all at once. You will need to add this text below (in red) to the "custom_full.css" style sheet file. Open your course and Click on Style / then click on custom_full.css. Copy this text below and paste it into the Style sheet and save your change. See example below.
                tr.inserted {
                    color:#FFFFFF;
                    font-size: inherit !important;
                 }
(Note: ffffff is white - if you wish to use a different color you will need to go to this site http://www.color-hex.com/color-palettes/ select a color scheme to see the Hex color code and replace the 6 "F" with another code.)The feedback color can not change. Green is for Correct and Red of course means incorrect.
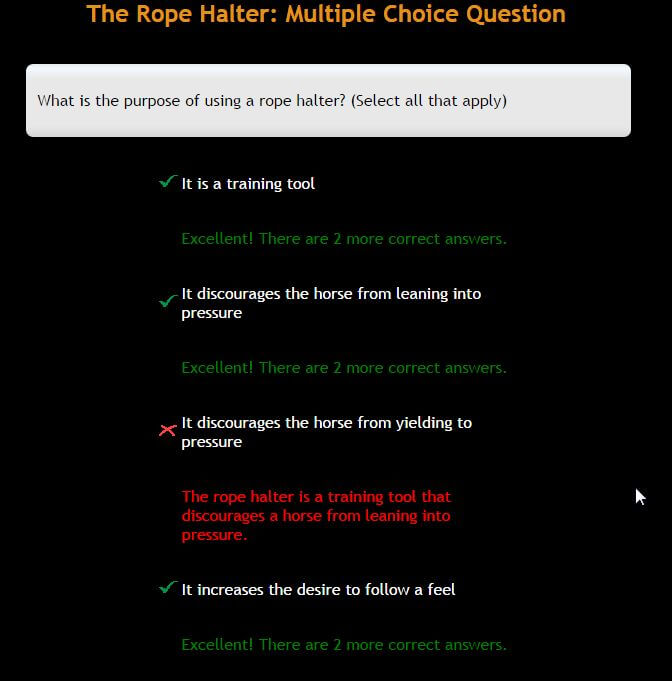
Click Preview with Question Feedback and you will see the feedback for your questions and see what is Right and wrong (only SMEs see this).
63: How do I make the content of a table cell wrap within the table (and flex box) instead of flowing outside the table's boundary?
You must set the table layout style to "fixed" and, optionally, specify the column widths.
1. Right-click in the table and under the "table" icon of the WYSIWYG toolbar choose "Table properties".
2. Click the "Advanced" tab and insert "table-layout: fixed;" into the "Style" box and click "Ok".
This will force the table to use fixed column widths and will size the cell contents accordingly, avoiding any overflow. To override the automatic column widths (which gives each column an equal width):
1. Right-click in a cell of the first row of the column you want to set
2. From the "Table" icon of the WYSIWYG toolbar choose "Cell" and "Cell properties"
3. Enter a value for the "width" with units (px or %) -- percentage works best.
For example, if you have two columns you could set the width of one to "75%" and this will size the other column at 25% of the table width at all times and keep all cell contents within the table.